Imagine having a garden that practically takes care of itself, giving you more time to enjoy the things you love. Sounds like a dream, right?
With a smart irrigation system powered by Arduino, that dream can become a reality. You don’t need to be a tech wizard to set this up. With just a few components and some simple steps, you can create a system that waters your plants automatically, saving you time, water, and effort.
You’ll discover how easy it is to build your own smart irrigation system using Arduino. We’ll guide you through the process, breaking it down into manageable steps that anyone can follow. By the end, you’ll be equipped with the knowledge to transform your gardening experience. Are you ready to take control and give your garden the care it deserves? Let’s dive in!
Components And Materials
Creating a smart irrigation system with Arduino is both fun and practical. It requires the right components and materials. These items are essential for bringing your project to life. Understanding each component helps you build a successful system.
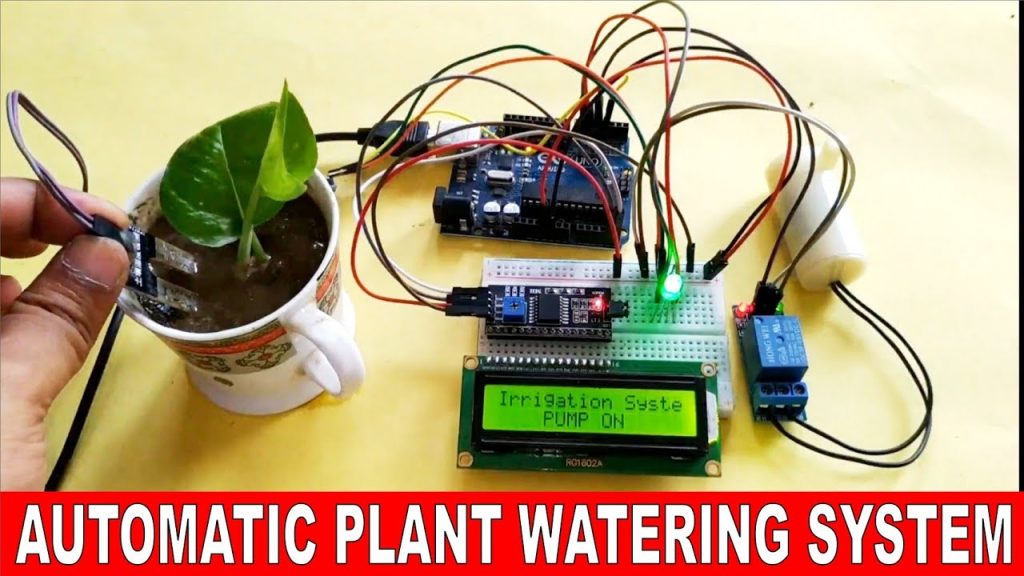
Arduino Board
The heart of your irrigation system. An Arduino board processes inputs and controls outputs. It is user-friendly and easy to program. Choose a board that fits your needs. The Arduino Uno is popular among beginners.
Soil Moisture Sensor
This sensor detects the moisture level in the soil. It sends data to the Arduino board. This information helps in deciding when to water. Accurate readings ensure plants get the right amount of water.
Water Pump
The water pump delivers water to your plants. It is controlled by the Arduino board. Choose a pump with the right power for your garden size. Consider energy efficiency and compatibility with your system.
Relay Module
The relay module acts as a switch for the water pump. It connects the Arduino board to high-power devices. This module ensures safe operation of the irrigation system. It is crucial for controlling electrical devices.
Power Supply
A reliable power supply is necessary for the system. It powers the Arduino board and other components. Ensure the voltage matches your device requirements. A stable power supply prevents interruptions.
Connecting Wires
Connecting wires link all components together. They transmit signals and power across the system. Use quality wires for durability and safety. Organized wiring keeps the system neat and functional.
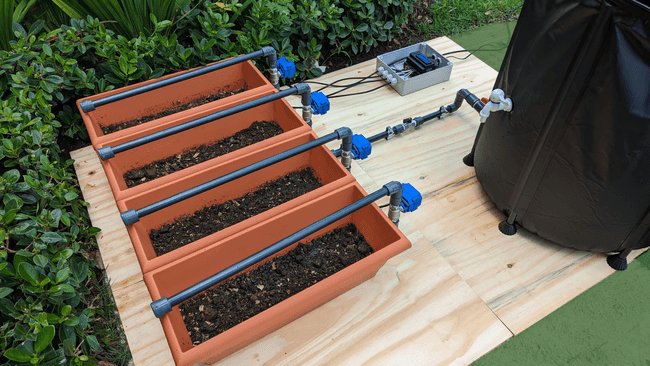
Water Tubing And Valves
Water tubing directs water from the pump to the plants. Valves control water flow in the system. Choose durable materials for tubing. Proper installation ensures efficient water distribution.
Software
Software is vital for programming the Arduino board. Use the Arduino IDE to write and upload code. Software controls how the system operates. It allows customization for your specific needs.
Setting Up Arduino
Setting up Arduino for a smart irrigation system is straightforward. With Arduino, you can create a system that waters plants efficiently. Begin by gathering necessary components like Arduino board and sensors.
Understanding Arduino Basics
Arduino is an open-source platform. It helps build electronic projects. The board reads inputs and turns them into outputs. Learn about its components and functions. This knowledge is crucial for your irrigation project.
Gathering Essential Components
Start with an Arduino Uno board. It’s ideal for beginners. Add soil moisture sensors to measure plant water needs. Include a relay module to control water pumps. Collect jumper wires for connections.
Installing Arduino Ide
Arduino IDE is the software for coding. Download it from the Arduino website. Install it on your computer. Use it to write and upload code to the board. The IDE is user-friendly and essential for programming.
Connecting The Hardware
Connect the moisture sensor to the board. Use jumper wires for connections. Link the relay module to the board. Ensure all components are firmly attached. This setup helps the system function properly.
Writing The Code
Write simple code in Arduino IDE. Start with basic commands. Program the system to read sensor data. Set conditions for the relay to activate the pump. Test the code for errors. Adjust the code for better efficiency.
Integrating Sensors
Creating a smart irrigation system with Arduino involves integrating sensors to monitor soil moisture levels. Sensors help automate water distribution based on real-time data, ensuring efficient water use. This technology aids in maintaining healthy plants while conserving resources.
Integrating sensors into your smart irrigation system is where the magic truly begins. These little devices are the heartbeat of your setup, allowing your system to make intelligent decisions about when and how much to water your plants. When I first started with Arduino projects, understanding how sensors worked felt like unlocking a new world of possibilities.Understanding Sensor Types
Before you dive in, it’s crucial to know the types of sensors you might need. Soil moisture sensors are a popular choice because they directly measure the water content in the soil. Temperature and humidity sensors can provide additional data to optimize your watering schedule. Think about your garden’s specific needs. If you live in an area with unpredictable rainfall, a rain sensor can prevent unnecessary watering. What types of sensors will best support your garden’s health?Connecting Sensors To Arduino
Once you’ve selected your sensors, it’s time to connect them to your Arduino board. Start with the basic connections. Most sensors have three pins: power, ground, and signal. Use jumper wires to connect these pins to the corresponding ports on the Arduino. When I first did this, I was amazed at how straightforward it was. But don’t rush. Double-check your connections to avoid short circuits. Have you ever had a project fail due to a simple wiring mistake?Writing The Code
With sensors in place, the next step is coding. Use the Arduino IDE to write a simple program that reads data from your sensors. Begin with basic examples available in the Arduino library to get a feel for the syntax. The first time I saw real-time data displayed on my computer screen, it was a game-changer. Adjust the code to suit your needs. How can you refine your system to make it more efficient?Testing And Calibration
Testing is vital. Run your program and check if the sensors provide accurate readings. Place the soil moisture sensor in wet and dry soil to see if the readings change as expected. During my initial testing, I found that calibration was necessary to get precise results. Fine-tune your system to respond correctly to environmental changes. Have you ever considered how seasonal shifts might affect your setup?Ensuring Sensor Longevity
Sensors are delicate and can be affected by weather conditions. Protect your sensors from harsh elements by using covers or enclosures. Regular maintenance checks can also prolong their life. In my experience, taking these precautions saved me from frequent replacements. Are you prepared to maintain your sensors for long-term success? Integrating sensors is an exciting step in building a smart irrigation system. By choosing the right sensors, ensuring proper connections, and maintaining them well, you set the foundation for a robust and efficient system. What new insights have you gained about making your irrigation smarter?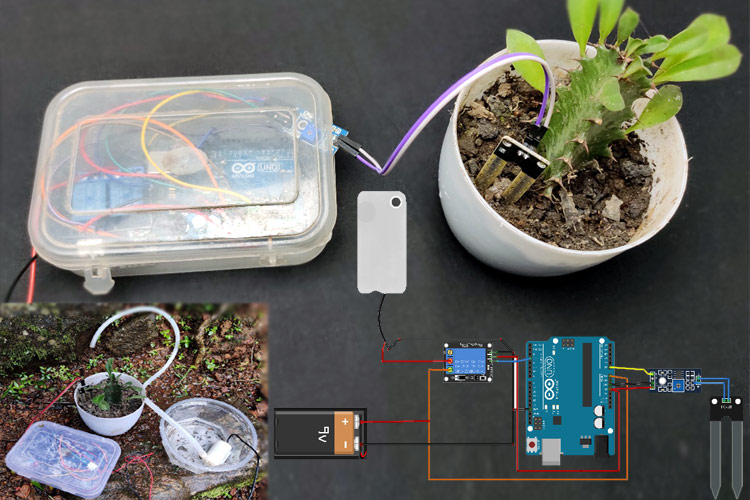
Programming And Automation
Explore smart irrigation by building systems with Arduino. Automate watering and save resources efficiently. Enhance your garden’s health using sensors and programmable controls.
Building a smart irrigation system with Arduino is an exciting project that combines creativity with technology. The heart of this project lies in programming and automation. These elements transform a basic setup into an intelligent system that waters your plants just when they need it. Imagine the freedom of not worrying about your garden while you’re away, knowing it’s being cared for with precision.Understanding The Basics Of Arduino Programming
Arduino programming is approachable even if you’re new to coding. The language is similar to C++, a common programming language. Start by downloading the Arduino Integrated Development Environment (IDE) on your computer. You will write your code here and upload it to your Arduino board. The first task is getting familiar with basic functions like `setup()` and `loop()`. These functions help you define what the system should do when it starts and what it should keep doing.Creating The Watering Logic
The crux of smart irrigation is its ability to decide when to water the plants. Sensors come into play here, specifically soil moisture sensors. They provide data that your Arduino can use to make decisions. Write a program that reads the sensor data. If the moisture level drops below a certain point, the system should trigger a pump to water the plants. This logic is simple but effective. It ensures your plants get water when they need it, not according to a fixed schedule.Scheduling With Timers
While sensors provide immediate feedback, timers can add an additional layer of automation. You might want to water your plants at specific times. For this, use the `millis()` function, which helps keep track of the time since the Arduino started running. Set a timer to water your plants early in the morning or late in the evening. This is when evaporation rates are lower, making watering more efficient. This scheduling ensures that the system uses water wisely.Integrating A User Interface
Consider adding a simple interface to monitor and control the system. An LCD screen can display current soil moisture levels and the next watering schedule. This addition is not only practical but also gives your project a professional touch. Imagine checking the status of your garden with a quick glance. It makes managing your system more intuitive and engaging.Testing And Troubleshooting
Testing is a crucial part of building your smart irrigation system. Initially, the system might not work perfectly. Debugging is part of the process, and every error is a learning opportunity. Start by checking your connections and ensuring sensors are correctly placed. Use the Serial Monitor in the Arduino IDE to track sensor readings and system actions. Adjust your code based on the feedback you receive. Isn’t it exciting to think about the possibilities once your system is up and running? How might this project inspire you to automate other areas of your life?
Conclusion
Creating a smart irrigation system with Arduino is practical and rewarding. You save water and ensure plants receive the right amount of moisture. The process is straightforward and enhances your tech skills. You learn to integrate sensors and code effectively.
This project suits hobbyists and those new to programming. Enjoy experimenting and refining your system. Your garden will thrive with minimal effort. Plus, you contribute to sustainable practices. Start building today and watch your garden flourish. Keep exploring innovative ways to improve your irrigation system.
It’s a valuable skill for future projects.