Imagine turning your kitchen scraps into rich, fertile soil without ever leaving your home. Vermicomposting, the art of using worms to decompose organic waste, offers an eco-friendly way to recycle your leftovers while enriching your garden.
Whether you’re a gardening enthusiast or just someone looking to reduce waste, vermicomposting at home can transform your approach to sustainability. Have you ever wondered how a small worm can make such a big difference? This process not only minimizes your carbon footprint but also yields a nutrient-rich compost that can boost your plants’ health.
As you read on, you’ll discover the straightforward steps to start your own worm bin, along with the compelling benefits it brings. Are you ready to dive into the world of vermicomposting and unleash nature’s recyclers in your home? Let’s explore how you can make a big impact with these little creatures.
Vermicomposting Basics
Vermicomposting transforms kitchen waste into valuable compost using worms. It’s an easy and efficient way to recycle food scraps at home. This method helps reduce waste and enrich your soil with nutrients.
Understanding the basics of vermicomposting is essential for success. Let’s explore the key elements involved.
What Is Vermicomposting?
Vermicomposting uses worms to decompose organic material. Red wigglers are popular for this process. They consume waste and produce nutrient-rich compost.
Setting Up Your Vermicompost Bin
A suitable bin is crucial for vermicomposting. Use a container with air holes for ventilation. Place the bin in a cool, dark area.
Bedding for the worms includes shredded newspaper or cardboard. Moisten the bedding slightly to create a comfortable habitat.
Choosing The Right Worms
Red wigglers are the best choice for vermicomposting. They thrive in decomposing organic matter. Ensure you have enough worms for your bin size.
Feeding Your Worms
Feed the worms with vegetable scraps, fruit peels, and coffee grounds. Avoid meat, dairy, and oily foods. These can attract pests and harm the worms.
Chop food scraps into small pieces for quicker decomposition.
Maintaining Your Vermicompost Bin
Check the moisture level regularly. The bedding should feel like a damp sponge. Too much moisture can lead to bad odors. Too little can dry out the worms.
Turn the bedding occasionally to aerate the bin. This prevents compaction and ensures efficient decomposition.

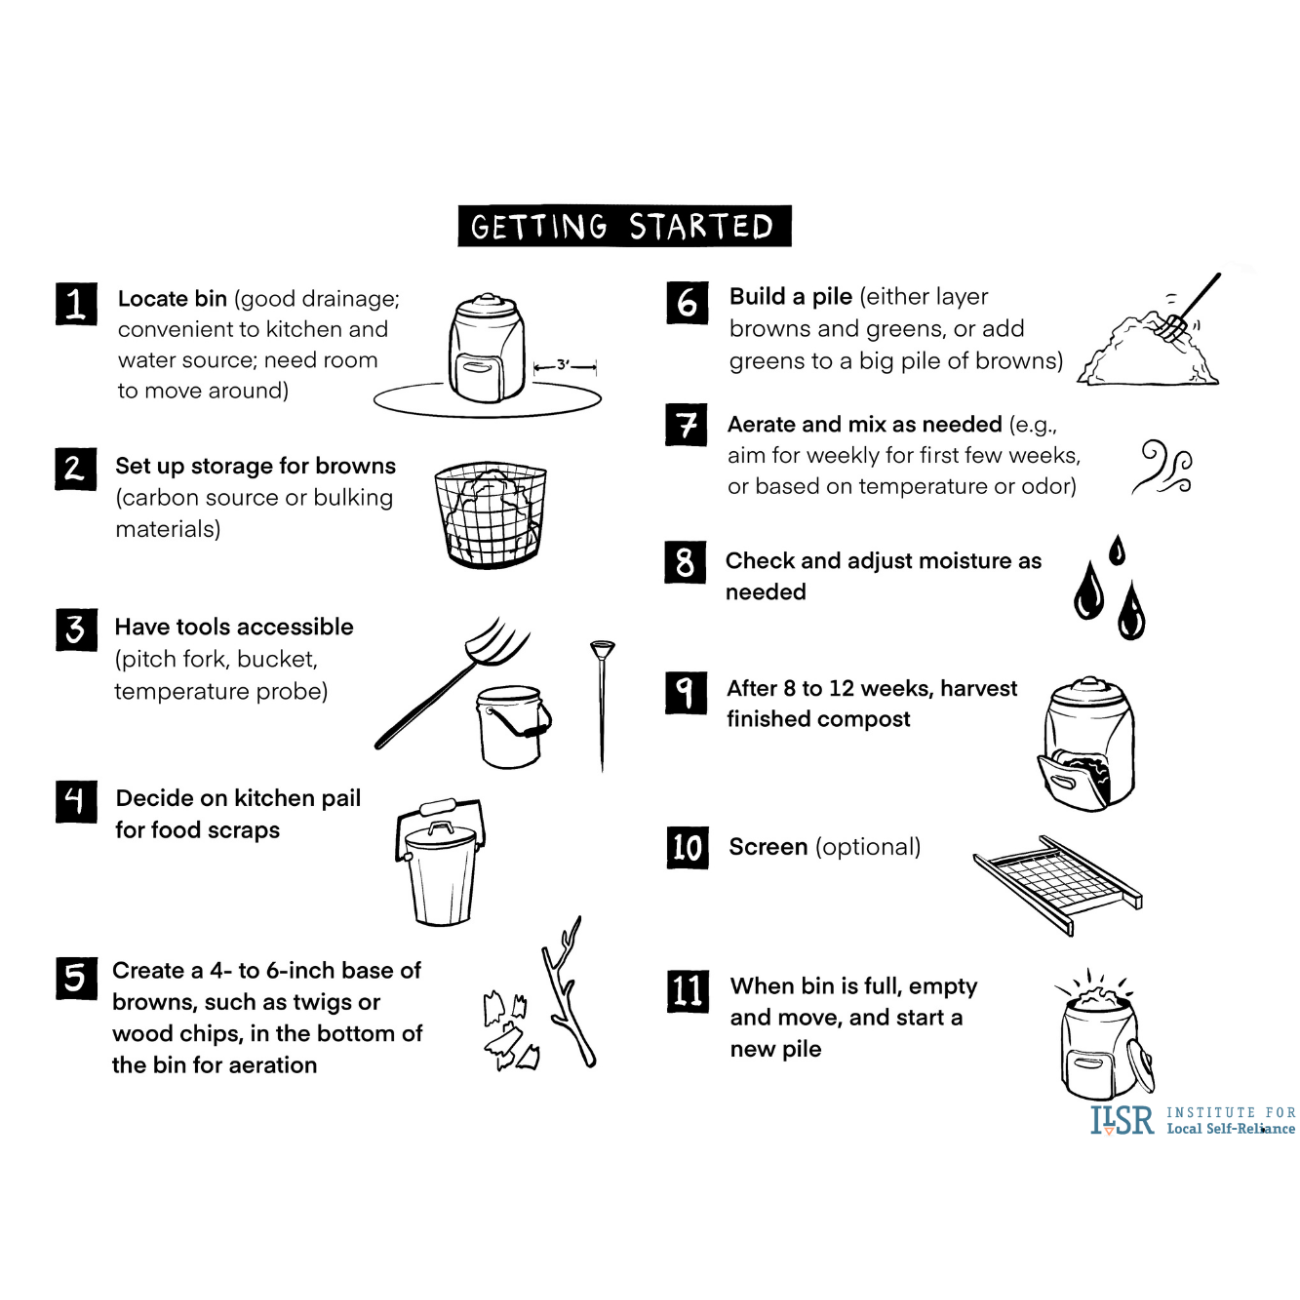
Setting Up Your Worm Bin
Setting up your worm bin is an exciting step in vermicomposting. This process helps you turn kitchen scraps into nutrient-rich soil. With a few materials, you can start your worm bin indoors or outdoors.
Choosing The Right Container
The container should be breathable and opaque. A plastic bin works well for this. Ensure it is large enough for the worms and food scraps. Drill small holes on the sides for ventilation.
Preparing Bedding For The Worms
Bedding is crucial for worm comfort. Use shredded newspaper or cardboard. Moisten the bedding until damp but not soggy. Mix in some soil to help the worms digest.
Adding The Worms
Red wigglers are the best choice for vermicomposting. They thrive in organic waste and are easy to care for. Place them gently on the bedding. Allow them time to settle in their new home.
Feeding The Worms
Feed the worms with vegetable scraps, fruit peels, and coffee grounds. Avoid meat, dairy, and oily foods as they attract pests. Chop food scraps into small pieces for faster breakdown.
Maintaining The Worm Bin
Check moisture levels regularly to keep the bedding damp. Turn the bedding occasionally for aeration. Remove excess food if worms cannot finish in a few days.
Managing The Compost Process
Vermicomposting at home requires careful management. The process involves nurturing worms to break down organic waste efficiently. Proper care ensures a healthy environment for the worms. This leads to nutrient-rich compost for your plants.
Monitoring Moisture Levels
Moisture is crucial in vermicomposting. Worms thrive in damp conditions. Use a spray bottle to maintain moisture. Avoid over-watering, which can drown the worms. The bedding should feel like a wrung-out sponge.
Maintaining Optimal Temperature
Temperature influences worm activity. Keep the compost bin between 55°F and 77°F. Worms slow down in cooler temperatures. In extreme heat, they might die. Place the bin in a shaded, cool area to regulate temperature.
Feeding The Worms
Feed the worms regularly with kitchen scraps. Avoid meat, dairy, and oily foods. These attract pests and cause odor. Chop scraps into small pieces for quicker decomposition. Only feed when the previous batch is nearly gone.
Turning The Bedding
Turning the bedding aerates the compost. It helps to maintain oxygen levels. Use a small rake or hand fork. Turn the bedding every few weeks. This prevents anaerobic conditions and bad smells.
Checking For Pests
Pests can invade the compost bin. Keep an eye out for fruit flies and mites. To prevent pests, cover food scraps with bedding. If pests appear, reduce feeding and add more dry bedding.
Harvesting The Compost
Harvesting occurs when the bedding turns dark and crumbly. This indicates mature compost. Gently separate worms from the compost. Use the finished compost in your garden. It’s rich in nutrients and enhances soil health.
Advantages Of Vermicomposting
Vermicomposting offers numerous benefits for those composting at home. This process uses worms to break down organic waste. The result? Rich, nutrient-packed compost. Many gardeners love this natural method. It’s simple, effective, and eco-friendly.
Environmental Benefits
Vermicomposting reduces waste in landfills. Organic waste transforms into valuable compost. This process cuts down methane emissions. Less waste means a cleaner environment. It’s a small change with a big impact.
Soil Improvement
Vermicompost enriches soil with essential nutrients. It improves soil structure and water retention. Plants grow healthier and stronger. Gardeners notice vibrant blooms and lush greenery.
Cost-effectiveness
Vermicomposting is budget-friendly. It reduces the need for chemical fertilizers. Home composting saves money. The initial setup is affordable. Over time, the savings add up.
Easy Maintenance
Maintaining a vermicompost bin is simple. Worms do most of the work. Regular feeding and occasional turning are enough. It’s suitable for small spaces. Even apartment dwellers can try vermicomposting.
Educational Value
Vermicomposting teaches sustainability. It’s a fun learning experience for kids. They see waste transform into compost. It encourages environmental responsibility. This knowledge is valuable for future generations.
Conclusion
Vermicomposting offers a simple way to recycle kitchen waste. It turns scraps into rich, organic fertilizer. This method is eco-friendly and reduces household waste. You can easily start vermicomposting in a small space. Just a bin and worms are needed.
Benefits include healthier plants and reduced garbage. It’s a natural process that enriches the soil. Less waste and more nutrients for your garden. Vermicomposting is a rewarding hobby that saves money. Try it today and help the environment. Your garden will thank you.
Plus, you contribute to a greener planet.