
Imagine turning kitchen scraps and yard waste into nutrient-rich soil with minimal effort and cost. Sounds appealing, right?
Composting is not only an eco-friendly practice but also a clever way to boost your garden’s health. The good news is, you don’t need to spend a fortune to create a composting pit. In this guide, we’ll show you how to build a low-cost composting pit right in your backyard.
You’ll discover simple steps and practical tips to transform everyday waste into valuable compost. Whether you’re a seasoned gardener or a curious beginner, this easy-to-follow method will make you excited to start composting. Stick around, because what you learn here could change the way you manage waste and nourish your garden forever.

Benefits Of Composting
Composting offers numerous advantages for both the environment and home gardens. Transforming kitchen scraps into nutrient-rich soil is rewarding. A low-cost composting pit is a sustainable choice. It reduces waste and improves soil quality.
Environmental Impact
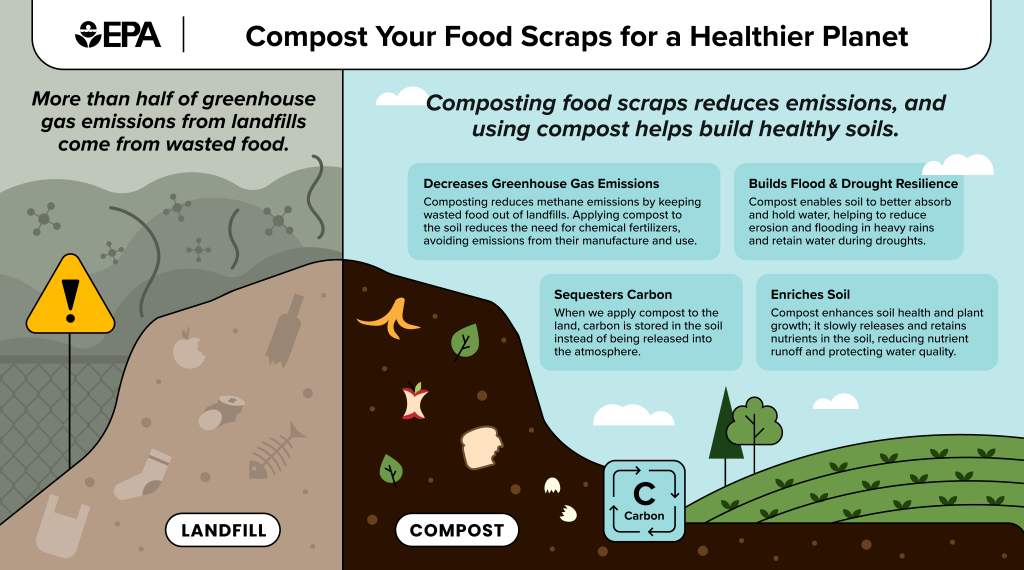
Composting reduces landfill waste significantly. Organic waste decomposes naturally in a compost pit. It helps lower methane emissions. Methane is a harmful greenhouse gas. This process promotes a healthier planet.
Soil Enrichment
Compost adds essential nutrients to the soil. It enhances soil structure and fertility. Plants grow stronger with enriched soil. Healthy plants resist diseases better. Your garden will thrive with composted soil.
Cost Savings
Composting reduces the need for chemical fertilizers. It saves money on soil conditioners. You use kitchen waste effectively. This reduces household waste disposal costs. It’s a budget-friendly gardening solution.
Water Retention
Compost improves soil’s ability to retain water. Less watering is needed for plants. It reduces water usage in gardens. This is beneficial during dry seasons. Your plants stay hydrated longer.
Community Contribution
Composting creates awareness about waste management. It encourages community involvement in environmental care. Sharing composting tips strengthens community bonds. It fosters a sense of responsibility. Everyone benefits from a cleaner environment.
Choosing The Right Location
Select a dry, shaded spot for your composting pit. Ensure good drainage to prevent waterlogging. Keep it accessible for easy maintenance and use.
Choosing the right location for your composting pit is crucial for its success. Imagine having a compost pit that’s easily accessible yet discreetly tucked away. It’s not just about where it fits in your backyard; it’s about maximizing efficiency and minimizing issues. Let’s dive into how you can pick the perfect spot for your composting pit.Assess Accessibility
Your compost pit should be easily reachable. Consider the frequency you’ll be adding kitchen scraps or garden waste. You don’t want to trek across your entire yard every time you have compostable material. Think about a location that’s near where most of your organic waste is generated. This proximity can make composting feel less like a chore and more like a seamless part of your routine.Avoid Direct Sunlight
Direct sunlight can dry out your compost, slowing down the decomposition process. While sun exposure is necessary, too much can be detrimental. Pick a spot with partial shade to maintain moisture levels. Perhaps near a tree or a fence that casts a shadow during the hottest part of the day. This balance will aid in maintaining the right temperature for microorganisms to break down material efficiently.Consider Water Drainage
Waterlogged compost is a no-go. Check the drainage around your chosen location. You don’t want your pit to become a soggy mess after heavy rain. Slightly elevated areas or spots with good drainage are ideal. If you’ve ever stepped into a muddy backyard after a storm, you know how crucial this consideration can be.Minimize Odor Concerns
Composting can sometimes produce odors. While most are earthy and natural, you might want to keep your pit away from windows or doors. Think about wind direction and how odors might travel. Position your pit so potential smells are directed away from living spaces. This small step can save you from unexpected wafts of compost aroma during a backyard barbecue.Ensure Privacy
Your compost pit doesn’t need to be the star of your landscape. If you’re worried about aesthetics, find a spot that’s somewhat hidden. Behind a shed or in a corner masked by shrubs could be perfect. This ensures your composting efforts don’t clash with your garden’s beauty while still being functional. Choosing the right location for your compost pit can make all the difference in how effective and convenient your composting journey is. Have you thought about where you might place yours?Materials Needed
Creating a low-cost composting pit is an eco-friendly way to reduce waste. You can use simple materials to make your own compost at home. This process is affordable and easy. Let’s explore the necessary materials to get started.
Wooden Pallets Or Old Bricks
Wooden pallets are perfect for building the compost structure. They are easy to find and often free. Old bricks can also work well. Both materials help create a sturdy frame. They allow air to flow through the compost.
Garden Fork Or Shovel
A garden fork is useful for turning the compost. It helps mix the materials and speed up decomposition. A shovel can also do the job. Choose what feels comfortable for you.
Organic Waste
Collect kitchen scraps like fruit peels and vegetable bits. These materials break down quickly. Grass clippings and leaves are also ideal. Avoid meat and dairy products. They attract pests and slow down composting.
Water Source
Compost needs moisture to break down. A nearby water source is essential. Use a garden hose or a watering can. Keep the compost damp but not soaked.
Compost Thermometer (optional)
A compost thermometer can help monitor the temperature. It shows if the compost is decomposing properly. This tool is optional but useful. It helps maintain the right conditions.
Step-by-step Construction
Create a composting pit with simple steps for a budget-friendly garden solution. Dig a hole, line it with organic materials, and add waste to start composting. Transform kitchen scraps into nutrient-rich soil effortlessly.
Creating a composting pit is a rewarding way to recycle kitchen scraps and garden waste into rich, fertile soil. Building your own low-cost composting pit doesn’t require fancy materials or expert skills. With some basic tools and a bit of time, you can transform your garden into an eco-friendly powerhouse. Let’s walk through the process step-by-step, ensuring each phase is clear and manageable. ###1. Gather Your Materials
Start with what you have. You’ll need some basic materials like wooden pallets, wire mesh, or even old bricks. Think about what’s accessible and cost-effective for you. A neighbor once shared that he used leftover wooden crates, saving money and repurposing waste. ###2. Choose The Right Location
Select a spot with good drainage and partial sunlight. Your compost needs warmth but not too much direct sun, which can dry it out. Consider areas away from your house or vegetable garden to avoid any unwanted odors. ###3. Measure And Mark The Area
Decide the size of your pit based on the amount of waste you generate. Use a tape measure to mark out a square or rectangular area. Remember, a pit too small might overflow, while too large could be hard to manage. ###4. Dig The Pit
Grab a shovel and start digging to a depth of about two to three feet. This depth ensures proper aeration and heat retention for the composting process. If you’re working with kids, let them help; it’s a fun way to teach sustainability. ###5. Build The Structure
Use your gathered materials to create the walls of the pit. Wooden pallets can be nailed together, while bricks or stones can be stacked. Ensure there’s enough space for airflow, which is crucial for breaking down organic matter. ###6. Layer Your Compost
Begin with a layer of coarse materials like twigs or straw at the bottom. This aids drainage and airflow. Continue adding alternating layers of green (nitrogen-rich) and brown (carbon-rich) materials. Think kitchen scraps versus dry leaves. ###7. Maintain Your Compost Pit
Turn your compost with a pitchfork every couple of weeks. This aerates the mix, speeds up decomposition, and prevents odors. Keep the compost moist but not soggy, like a damp sponge. ###8. Harvest Your Compost
After a few months, your compost should be ready to use. It will look dark, crumbly, and smell earthy. Use it to enrich your garden beds, giving your plants the nutrients they crave. Building a composting pit is not just an eco-friendly choice; it’s a step towards sustainable living. What creative materials can you find around your home to get started?
Conclusion
Building a composting pit saves money and benefits the environment. It’s simple, requiring basic materials found at home. This project reduces waste and enriches soil for gardening. Anyone can create a pit, even without prior experience. Just follow the steps for success.
Your backyard will transform into a fertile ground. Plants will grow stronger and healthier. Composting is easy and rewarding. Start today and see the difference it makes. Enjoy the process and contribute to a greener planet. Happy composting!