Unlocking the secrets of your soil can be the key to a thriving garden or a bountiful farm. Whether you’re growing tomatoes in your backyard or managing acres of crops, understanding soil fertility is crucial.
But how do you know if your soil is up to the task? The good news is, you don’t need a lab coat or a degree in chemistry to find out. You can test soil fertility right from the comfort of your home or farm.
Imagine having the power to boost your plant’s growth and increase your yield without ever leaving your property. Intrigued? Read on to discover simple, effective methods to ensure your soil is as fertile as it should be, and get ready to transform your growing space into a lush, productive haven.
Soil Testing Basics
Understanding soil fertility is crucial for successful farming and gardening. Soil testing helps determine nutrient levels and pH balance. This ensures plants get the nutrients they need to thrive. Testing soil at home or on a farm is simple and effective. It helps create a more productive growing environment.
Why Test Your Soil?
Testing soil gives insight into its nutrient composition. It identifies deficiencies that may affect plant growth. Knowing soil conditions helps make informed fertilization decisions. This boosts plant health and yields.
Tools Needed For Soil Testing
Basic tools for soil testing are easy to find. A soil testing kit is essential. It includes pH indicators and nutrient level tests. A clean spade or trowel helps collect samples. A bucket is useful for mixing soil samples.
Collecting Soil Samples
Collect samples from different areas of your land. This gives a comprehensive view of soil health. Dig 6 inches deep and gather soil from multiple spots. Mix these samples in a bucket for uniformity.
Testing Soil Ph
pH levels affect nutrient availability to plants. Use a pH test kit to check soil acidity. Follow instructions on the kit for accurate results. Adjusting pH improves plant nutrient uptake.
Nutrient Analysis
Analyze soil for essential nutrients like nitrogen, phosphorus, and potassium. These are key for plant growth. Use the soil test kit for nutrient analysis. Compare results with ideal levels for your plants.
Interpreting Test Results
Test results guide fertilization plans. High or low nutrient levels affect plant health. Use results to balance soil nutrients. This ensures optimal plant growth and productivity.

Tools And Materials Needed
Testing soil fertility at home or on your farm is essential. It ensures your plants receive the nutrients they need. Knowing the tools and materials needed is crucial. The right equipment makes the testing process efficient and accurate. Below, we’ll explore the necessary tools and materials.
Ph Meter
A pH meter helps measure the acidity or alkalinity of soil. It provides accurate readings crucial for plant growth. Ensure the meter is calibrated for precise results.
Soil Thermometer
A soil thermometer checks the temperature of the soil. Temperature affects nutrient availability and seed germination. This tool helps in planning planting schedules.
Soil Test Kit
Soil test kits are comprehensive and user-friendly. They typically measure pH, nitrogen, phosphorus, and potassium levels. Kits often include instructions for easy use.
Hand Trowel
A hand trowel is essential for collecting soil samples. It allows you to dig and gather soil from different depths. Look for a sturdy and comfortable design.
Plastic Bags Or Containers
Plastic bags or containers store collected soil samples. They prevent contamination before testing. Labeling each sample ensures accurate tracking.
Notebook And Pen
Documenting results is vital for future reference. A notebook and pen help keep track of findings. Record dates, locations, and specific conditions observed.
Step-by-step Testing Process
Testing soil fertility at home or on a farm involves simple steps. Begin by collecting soil samples from various spots. Use a home testing kit to measure nutrients, pH levels, and moisture. Regular testing ensures healthy plant growth and better crop yields.
Testing soil fertility at home or on your farm can feel like a daunting task, but breaking it down into steps makes it manageable and even enjoyable. Understanding your soil’s health is crucial for growing thriving plants. Whether you’re a gardening novice or a seasoned farmer, a systematic approach can reveal insights into your soil that you might not expect. Let’s dive into the step-by-step process that will empower you to assess your soil’s potential. ###Gather Your Materials
First, you need to gather essential tools and materials. A soil testing kit is crucial, and you can find one at most gardening stores. You’ll also need a clean trowel, a small bucket, and a clean plastic container. If you don’t have a testing kit, you can use vinegar and baking soda for a DIY pH test. Keep a notebook handy for jotting down your observations. ###Collect Soil Samples
Select several spots in your garden or field. Dig about six inches deep to collect soil. Mix samples from different areas in the bucket to get an average sample. This helps identify the overall condition rather than anomalies in one spot. Remember to remove any debris, like leaves or rocks, from your sample. ###Conduct The Soil Test
Follow the instructions on your soil testing kit carefully. Most kits will test for pH, nitrogen, phosphorus, and potassium levels. If you’re using the DIY method, a fizz in vinegar indicates alkaline soil, while fizzing in baking soda suggests acidity. Note the results for each area tested. ###Analyze The Results
Compare your test results with the ideal range for the plants you wish to grow. Different plants thrive in different soil conditions. For example, vegetables generally prefer a pH between 6 and 7. Consider how your soil’s current state aligns with these needs. ###Implement Improvements
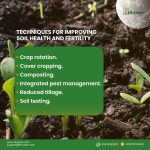
Based on your results, decide how to amend your soil. Adding compost can boost organic matter and nutrients. Lime can raise pH, while sulfur can lower it. Adjust your approach based on what you want to grow and the specific needs of your soil. ###Monitor And Adjust
Testing your soil is not a one-time event. Conditions change with weather and use. Plan to test your soil at least once a year to keep track of changes. This regular check-up ensures you’re always in tune with what your plants need to thrive. Testing soil fertility isn’t just a task—it’s a way to connect with your land and ensure it’s at its best. Have you ever been surprised by your soil test results? What changes did you make that led to better growth? Your experiences could help others, so feel free to share.
Interpreting Results And Taking Action
Understanding soil fertility is essential for healthy plants. Simple home tests reveal nutrient levels and pH balance. Take action by adjusting soil with organic matter or fertilizers to improve growth.
Understanding the results of your soil tests is just as important as conducting the tests themselves. Once you have your soil analysis, you’ll need to know what those numbers mean and what steps to take next. This is where the magic happens—transforming raw data into actionable steps for a healthier garden or farm.Understanding Soil Ph Levels
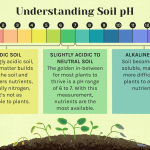
Soil pH is a crucial factor for plant growth. A pH level below 7 means your soil is acidic, while above 7 indicates alkalinity. Most plants thrive in a pH range of 6.0 to 7.5. If your soil is too acidic, consider adding lime. If it’s too alkaline, sulfur can help lower the pH. Adjusting soil pH can take time, so be patient and test regularly.Evaluating Nutrient Levels
Your soil test will reveal the levels of essential nutrients like nitrogen, phosphorus, and potassium. These are vital for plant health and productivity. Is your nitrogen level low? Try adding compost or a nitrogen-rich fertilizer. If phosphorus is lacking, bone meal might be your go-to solution. Check potassium too. Wood ash can help boost potassium levels naturally. Always follow recommended application rates to avoid over-fertilizing.Identifying Soil Texture And Structure
Soil texture affects water retention and root growth. Knowing whether your soil is sandy, clayey, or loamy helps in choosing the right plants and amendments. Sandy soils drain quickly but lack nutrients. Adding organic matter can improve this. Clay soils hold water well but can be compacted, so use gypsum to enhance drainage. Loamy soils are ideal, offering a balance of nutrients and drainage. If you’re lucky enough to have loamy soil, maintenance is key—regularly add compost to keep it healthy.Taking Sustainable Action
Once you’ve interpreted your soil data, take sustainable actions to improve it. Avoid chemical fertilizers when possible. Opt for organic amendments that benefit both your plants and the environment. Think about your long-term goals. Do you want a lush vegetable garden or a flower-rich landscape? Tailor your actions to meet these objectives. Are you ready to make the most of your soil test results? Your plants will thank you for it!
Conclusion
Testing soil fertility at home or on the farm is crucial. It helps boost plant growth and health. Simple tests can reveal soil nutrients and pH levels. Healthy soil leads to better crops and flowers. Regular testing ensures your soil stays fertile.
Make adjustments based on test results. Use organic matter or fertilizers if needed. This way, you maintain a productive garden or farm. Keep your soil in check and watch your plants thrive. Soil testing is easy and beneficial. Enjoy the fruits of your labor with healthier plants.